Saturday, February 23, 2013

The gift of...needs met

Philippians 4:19And my God will meet all your needs according to his glorious riches in Christ Jesus.4:20To our God and Father be glory for ever and ever. Amen.
When it comes to clothes, the hardest item for me to supply on my super tight budget is school jeans. Stores rarely clearance them down to my price point, and garage sales are usually best for play jeans (for an exception, check out this post). 
So imagine my excitement (read: restrained squeaking) when a coworker brought in some clothes "she thought my daughter could use".  Her daughter had outgrown them, and they didn't sell at the consignment shop she had taken them to. I've done a few alterations/repairs for her lately, and this was a form of thank you. And to that I say "You're welcome" and "Thank you Jesus!"
Check this out:


6 (count 'em: 6!) pair of jeans from: American Eagle, Aeropostale and SO. Plus 3 American Eagle shirts.
I actually added up the thrift store price tags on these practically Perfect clothes and came up with (drum roll please....)   $84.91! Can you imagine if I'd bought them at the mall?!
Seriously, how amazing is our God, right?


Sunday, February 17, 2013

Launch of Tweaked2911


My sister, Jessica Gottfried, and I have officially launched our Facebook page for a blossoming new business we call Tweaked2911. The "2911" references Jeremiah 29:11:

"For I know the plans I have for you,” declares the Lord, “plans to prosper you and not to harm you, plans to give you hope and a future."

We refashion previously loved textiles into creative new designs such as aprons, scarves and infant booties as well as custom memory items. Visit our page at www.facebook.com/Tweaked2911.

Saturday, February 9, 2013

Jewelry Frame

Another garage sale fantastically free find. This little gem was in the freebie box, looked over by the other shoppers due to it's 70's plasti-wood appearance. I rescued it, used some mid-grit sandpaper to rough up the smooth finish to prep the surface to take paint, then used an old toothbrush and some Lysol to remove the years of dust from the creases and let it dry.


I wanted to really emphasize the great detailing, so I bypassed a paintbrush and went straight for an old sock. That's right, my paint applicator of choice is an old sweat sock. Inside out, all those little nubbies really work great for rubbing paint over the detailing. Not into the detailing, or I would lose the contrast. The cheap Walmart craft paint works great. Allow to dry well between coats; you'll need at least 2 coats.
Using the glass as a template, cut a piece of foam core board to fit and cover with fabric.  I used glue stick to the front of the board to keep the fabric smooth, then wrapped the edges around to the back and secured with tape. Then I put push pins along the top at a 45 degree angle for hangers.


Voila!


See? Ugly is only paint deep. See my previous post to see a pinterest post using this same frame.


Thursday, January 24, 2013

Mirror to Chalkboard Transformation

One of the many sources of blessings in my life is garage sales. Sounds corny, I know, but you would be amazed at how God can very specifically meet the needs of my family at what someone might consider a "random" garage sale stop.
 Example: early this past spring my daughter was down to 1 pair of good-fitting jeans and had outgrown most of her dresses. A problem, but not one we had a lot of money to solve. As a home health nurse who sees pretty much the same patients on a weekly basis, my driving route does not vary much.  One day I had a patient cancel unexpectedly, right around lunch time. This resulted in my taking a different route to the next patient and some time to kill. Happened upon a garage sale and found 6 pair of name brand jeans in my daughter's size for $.50 each as well as 2 Sunday dresses for $.25 each. Coincidence? Nope. Answer to prayer? You betcha!
Fast forward 8 months and Christmas is coming on fast. My sister-in-law (who is a bigger pinterest junkie than I am) found an awesome picture frame to chalkboard project that was worthy of repeat.

http://farm5.static.flickr.com/4077/4863951194_f2a4eca464.jpg
(FYI I just realized I have the exact same frame as the blue one on the bottom, but I turned mine into a necklace organizer. I'll post it for you sometime.)


So I dug around in my garage sale freebie box finds and found a mirror I've had for a while, apparently kept for just such an occasion. There were two places where the mirror was roached, but the frame still looks neat, even though it had some dated gilding.

Mirror to Chalkboard Transformation
Step 1: Clean all the dust filled nooks and crannies.
Step 2: Prep mirror to hold paint. I sanded mine with some heavy grit sandpaper I found in the garage, but I've seen other blogs use spray glass frost/etching. If you sand, make sure the whole mirror surface has a steamed up look, no shiny areas.
Step 3: Spray paint the entire thing, mirror and frame, with spray paint color of your choice. I used the $.96 stuff from Walmart. Multiple very light coats work best. Trust me, it's worth the time.

Step 4: Chalk board paint to the middle. Got that at Walmart, too. I think it was $4.96. It worked well. Follow the directions on the bottle. Had I known, I would have tried this:
chalk paint recipe
http://www.snaptheconference.com/diy-chalk-paint-dresser/
This recipe makes a lot of paint, so cutting it down is recommended.
Step 5: Prep the dried chalkboard by rubbing it down with chalk.

I didn't get a finished project picture. Sorry. Just imagine the picture above with the middle completely painted black. Not too shabby for a $6 project, huh?

Point of the story, never underestimate God's power to provide.


Thursday, December 27, 2012

Sandy Hand Prints: This Present Science Experiment:

Being the crafty type, I enjoy making the gifts I give. That being said, prepare to meet a few of my Christmas creations. Some turn out like I plan, others do not. I considered this project a pretty big flop, but my sister-in-law loved her daughter's framed handprints. Flop or not, you decide.
Supplies: Frame(s) (with those wire staple things that hold the glass in. You know the kind; the ones that you're supposed to bend back with a screwdriver, but you're always in too much of a rush, so you hurt your fingernail in attempt before you realize you're a doof and go get a tool)  
            Playdough   -I would recommend reading this blog in it's entirety prior to choosing kind of playdough
            Plaster of Paris - Don't worry, it's not as scary as it sounds. Read the manufacture's instructions and it's a lot like making pancakes.
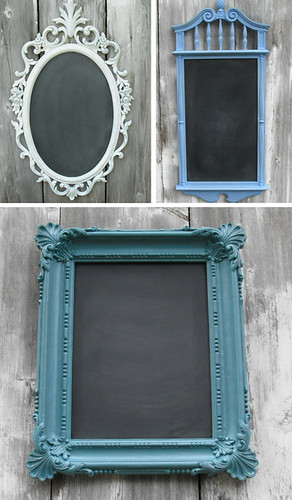
I started with these garage sale snagged mirrors. I can't remember if I paid .25 for the pair or apiece, but either way I had to leave the sticker on for the before pic. Gotta love a good deal, right?

Dated a scratched up, but solid wood.


Flipped them over a (gasp) tore the paper backing out and removed the mirrors.


A little black paint and we've got a whole new look.

The next step is a little tricky, and I apologize for lack of pictures. Flip the frame onto it's front on a firm, portable surface. I chose a cookie sheet. Next, press playdough into the open window, enough to fill the frame, but filling the depth to only about halfway. The metal staple supports that kept the mirror in place should be well visible. I got the directions from this great website: http://www.susiej.com/how-to-preserve-your-childs-footprint/
Really neat resource. I got off track when I decided to MAKE the playdough. And chose this recipe:


Recipe 2 
1 cup baking soda 
1/2 cup corn starch 
3/4 cup water 

Have your child mix the baking soda and corn starch in a pot. Use hands to make sure all the lumps are broken up. Add water. The adult should put the pan on the stove over medium heat and stir constantly. As soon as the mixture gathers together, remove from the heat. When it cools, have your child knead it into a smooth dough. Don't over cook this dough or it will crumble. http://www.kiddinaround.com/pages/3-Easy-Recipes-for-Making-Homemade-Play-Dough.html

Great playdough recipe, feels just like the store bought kind.

Have child firmly press handprint into backside of filled frame, then fill indentation with plaster of paris. Fill it up past and over the staple things to keep the plaster creation in the frame when it dries. This is where my project got interesting. Those of you who did well in chemistry probably saw this coming. I did not. The baking soda in the playdough reacted with the acidic plaster of paris, and about 5 minutes into when the plaster was supposed to be drying, it was bubbling like some kind of brew. I whined to my husband about my art project turned science experiment gone bad, but I let it bubble and eventually dry. Once dry, I flipped the frame over and removed the offending playdough. And this is my end result:

 
It doesn't look like it in the picture, but the hand print actually comes out of the frame, 3D like.
And does the surface not look like sand?
 I gave the frames to my sister in law who, ironically enough, loves the beach and recently returned from a family vacation with my same little nieces who were nice enough to allow me to mush their hands into playdough. She is excited to hang the handprints on the wall with the photographs from said trip.

So...if you would like to see/try the original project? Check out susiej.
If you want a little twist? Experiment. ;)


Wednesday, November 7, 2012

Dinner Details


I really appreciate all those old adages that ring true even into today:
"Wear it out, use it up, make it do or do without."
"A stich in time saves nine."
"Waste not want not".
"Prevention is the best medicine."
 I think they ring so true to me because they speak to doing the best with what you have. Lately God has really been convicting me to be a good steward of what I have. To honor Him with my time, talents and pocessions however contrary it may be to the current coveting and disposable society, always driven by the next newest thing.
God loves to take what we have, no matter how small or seemingly insignificant and make it great. Just like that whole loaves and fish deal when Jesus fed the 5,000. God is just waiting for the chance to bless us, we just need to relinquish control and allow Him to work.
Tonight was one of those opportunities. Groceries and time were running low, but I really didn't want to pass up the chance to bless my parents by cooking them supper. So I was obedient to His nudge to invite them, and gave the menu to Him.
Found some precooked diced chicken breast in the back of the freezer leftover from dinner a while back and googled "diced chicken".  God is so cool. The perfect recipe requiring little time and few ingredients popped up and (I must say) is good enough to add to our family favorites list. If I had wimped out and not given what I had over to Him to handle, we would not have had the evening with my parents, or the great new recipe and probably would have dumped money into something overpriced and undernutritious from a fast foodie.
The big things in life are defined in the little things. It may sound silly, but I'm finding the more I am able to give Him even the seemingly insignificant things, the easier it is to give up the bigger stuff.
Anyway, I'll pass on a new favorite:


Cheesy Chicken Crescent Dish


 http://www.cdkitchen.com/recipes/recipetemplateb.php?scale=8&mid=44794

INGREDIENTS:

3 1/2 cups cooked, cubed chicken
2 cups shredded cheddar cheese
2 cans (8 ounce size) refrigerated crescent rolls
1 can cream of chicken soup
1 can cream of mushroom soup
1 cup milk


DIRECTIONS:

Preheat oven to 375 degrees F.

Combine chicken and 1/2 the cheddar cheese. Separate crescent dough into triangles. Place about 3 Tbsp chicken mixture on wide end of each triangle and roll to opposite point.

In medium saucepan, combine soups, milk and 1/2 the remaining cheddar cheese. Heat until cheese melts. Pour half of soup mixture into greased 8 or 9 inch square baking dish. Reserve remaining soup mixture for sauce. Arrange filled crescents over hot soup mixture.

Bake at 375 degrees F for 20 to 25 minutes until golden brown. During last 10 minutes, sprinkle with remaining cheese. Serve with remaining sauce poured over the top.


Note: You have scaled this recipe to serve/make 8 (originally serves/makes 4). Please adjust for pan sizes, cooking times, measurements in the directions, and divided ingredients accordingly.


NUTRITION:

497 calories, 28 grams fat, 27 grams carbohydrates, 32 grams protein per serving.
Show full nutritional data (including Weight Watcher's Points ®, cholesterol, sodium, vitamins, and diabetic exchanges)

Sunday, October 21, 2012

Claire and Emily Photo shoot

Yesterday I had the privilege of taking pictures for some pretty adorable sisters. Being my cousin's kids, I'm thinking it runs in the family. :) Here is my favorite:
Thank you for making such pretty pictures, Emily and Claire!